The dental veneers procedure is a structured clinical workflow with nine stages: consultation and diagnostic records, Digital Smile Design (DSD), trial mock-up, tooth preparation, 3D intraoral scanning, temporary veneers, lab fabrication, try-in and shade verification, and final adhesive bonding. For most patients, the full process takes two to three appointments over 7 to 10 days when handled at one international clinic, or two to three weeks when the lab phase is external. The procedure is performed under local anaesthesia and is not considered painful.
Each stage controls one variable that affects the final outcome: shade, fit, occlusion, or bond strength. Tooth preparation is matched to the chosen material, with enamel reduction of 0.3 to 0.7 mm for porcelain and lithium disilicate and less for no-prep options. Adhesive bonding under controlled isolation is the most technique-sensitive step and the one that most affects how long the result lasts.
What Is the Dental Veneers Procedure?
The dental veneers procedure is a multi-stage clinical protocol that designs, fabricates, and bonds thin ceramic or composite shells to the front of the teeth to correct shape, shade, or alignment. Each stage has a specific function in the final outcome, so skipping any step reduces survival and aesthetic accuracy.
The procedure differs from a single dental appointment in three ways: it is planned digitally before clinical work begins, it produces a custom restoration manufactured outside the mouth, and it depends on a controlled adhesive bond to enamel. These three features are the reason a veneer treatment cannot be compressed into one chair-side visit without trade-offs in fit and longevity.
How Long Does the Veneers Procedure Take?
The full veneers procedure takes between 7 and 21 days in total clinical time, with the patient spending approximately 4 to 6 hours in the chair across two or three appointments. Timeline depends on the workflow and on whether the lab is in-house or external.
| Workflow | In-chair time per appointment | Number of visits | Total elapsed time |
|---|---|---|---|
| Same-clinic digital workflow (in-house lab) | 1-3 hours | 2-3 | 5-10 days |
| External lab workflow | 1-3 hours | 2-3 | 14-21 days |
| Composite (direct) veneers | 2-4 hours | 1 | Single appointment |
| No-prep porcelain veneers | 1-2 hours | 2 | 5-10 days |
Same-day composite veneers exist but apply only to single-tooth or minor-correction cases. Full ceramic veneer treatment cannot be completed in a single visit because the lab fabrication step is not compressible without sacrificing fit accuracy.
What Are the Steps of the Veneers Procedure?
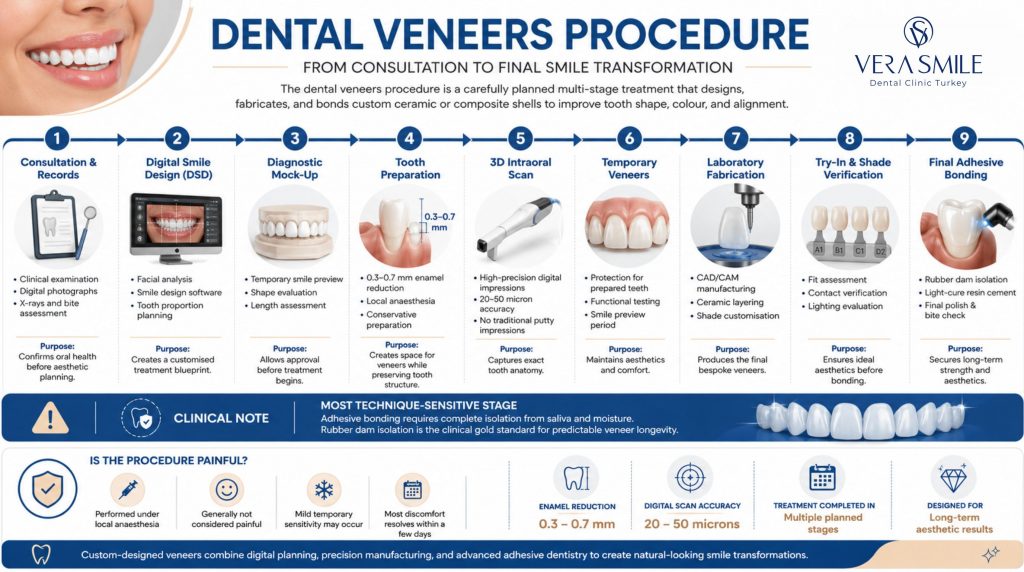
The veneers procedure follows nine clinical steps in fixed order. The list below summarises what happens in each step and what variable it controls.
- Consultation and diagnostic records: Intraoral photographs, X-rays, and clinical assessment confirm tooth health, gum status, and bite condition before any aesthetic planning begins.
- Digital Smile Design (DSD): A digital workflow overlays the proposed smile on the patient’s facial photographs, aligning tooth proportions, smile arc, and occlusion before material is selected.
- Diagnostic mock-up: A composite or 3D-printed preview of the planned design is placed temporarily on the teeth so the patient evaluates shape and length before commitment.
- Tooth preparation: Conservative removal of 0.3 to 0.7 mm of enamel (or less for no-prep cases) is performed under local anaesthesia, guided by the DSD plan.
- 3D intraoral scanning: A digital scan captures the prepared teeth at 20 to 50 microns of accuracy, replacing conventional putty impressions.
- Temporary veneers: Resin temporaries protect the prepared teeth and let the patient preview the final shape for several days.
- Lab fabrication: The lab mills or presses the veneers from the chosen ceramic, then layers and glazes them for shade and translucency.
- Try-in and shade verification: The veneers are placed without cement to confirm fit, contact, and final shade under different lighting conditions.
- Final adhesive bonding: Under rubber dam isolation, the veneers are bonded with a light-cure resin cement, then polished and bite-checked.
Clinical Note: The most technique-sensitive step is adhesive bonding. Contamination by saliva or blood at this stage compromises the bond and shortens the veneer’s lifespan. Isolation with a rubber dam is the published standard for predictable adhesion.
How Are Teeth Prepared for Veneers?
Tooth preparation for veneers removes a controlled layer of enamel, between 0.3 and 0.7 mm for porcelain and lithium disilicate, to create space for the ceramic without exposing the underlying dentine. Depth is guided by the DSD plan and by depth-cutter burs that limit reduction to the planned thickness.
- Depth control: Calibrated depth-cutter burs prevent over-reduction and keep at least 50% of the margin in enamel for stronger bonding.
- Margin design: A chamfer or feather-edge margin sits at or slightly below the gum line for an invisible transition.
- Enamel preservation: Modern protocols preserve as much enamel as possible because enamel-bonded margins are the strongest predictor of long-term survival.
- Provisional fit: Temporary veneers are placed immediately to protect prepared dentine, prevent sensitivity, and maintain the soft tissue contour.
Preparation depth differs by material. Composite veneers may require 0.0 to 0.3 mm of reduction. No-prep porcelain may require none. Lithium disilicate sits in the 0.3 to 0.5 mm range. Zirconia may require 0.5 to 1.0 mm.
What Happens During Veneer Bonding?
Adhesive veneer bonding is a controlled five-step protocol performed under rubber dam isolation: surface etching of tooth and veneer, silane and primer application, adhesive resin placement, light-cure cement seating, and final cure with bite verification. The entire bonding sequence takes 20 to 40 minutes per arch.
- Surface preparation: The tooth is etched with phosphoric acid to expose the enamel rod structure, and the veneer intaglio is treated with hydrofluoric acid and silane.
- Adhesive priming: A thin bonding resin is applied to both surfaces to create the chemical interface.
- Cement placement: Light-cure resin cement is loaded onto the veneer in a controlled thickness.
- Seating and excess removal: The veneer is placed firmly, excess cement is wiped, and a brief tack cure stabilises the position.
- Full cure and check: The cement is fully light-cured, the bite is verified, and the margins are polished.
Key Fact: The cement is what fails most often, not the ceramic. A clean isolation environment and a controlled cement film thickness are the two single most important variables in veneer longevity.
Is the Veneers Procedure Painful?
No. The veneers procedure is not considered painful when performed under local anaesthesia, which is the standard during tooth preparation. Most patients describe mild gum tenderness or temporary cold sensitivity in the days after preparation, both of which resolve as the temporaries settle and the gum tissue heals.
How is patient comfort managed during the veneers process?
Patient comfort during the veneers procedure is managed with local anaesthesia at the preparation stage and stage-specific measures at every other step, so the procedure is not considered painful. Consultation and 3D scanning are non-invasive and need no anaesthesia. Tooth preparation is carried out under local anaesthesia, during which the patient feels pressure but not pain. While the temporary veneers are in place, mild gum tenderness can last 24 to 48 hours and is managed with over-the-counter analgesia. Bonding is painless, because the prepared teeth are not sensitive once cleaned and isolated under the rubber dam.
After bonding, some patients report cold sensitivity for one to two weeks, while persistent sensitivity is uncommon and warrants clinical review. Patients with high dental anxiety can request additional sedation options, which are arranged in advance during the consultation.
What Should Patients Expect After the Procedure?
After the procedure, patients can eat normally within a few hours but should avoid hard foods, ice, and very pigmented drinks for the first 48 hours while the cement reaches full strength. Routine activities resume the same day.
- Cold or air sensitivity: Mild and short-lived, resolving within two weeks.
- Speech adaptation: Two to five days of slight adjustment as the tongue learns the new tooth contours.
- Gum response: A few millimetres of gentle gum inflammation that resolves with normal hygiene.
- Bite check: A short follow-up appointment in the first one to two weeks verifies even occlusion.
- Polish or refinement: Minor reshaping of contact points may be performed at the follow-up if needed.
Patient Tip: For the first two weeks, use a soft-bristled brush and a non-abrasive toothpaste. Aggressive abrasion can dull the surface glaze and shorten the early polish life.
Are There Risks During the Veneers Procedure?
Veneer procedure risks are low when the workflow is planned correctly, but five clinical risks are recognised: pulp irritation from deep preparation, debonding from compromised isolation, gum irritation from margin placement, shade or shape mismatch, and bite imbalance. Each risk has a defined mitigation step.
- Pulp irritation: Caused by preparation that approaches the pulp chamber, and mitigated by depth-cutter burs, DSD-guided preparation, and conservative reduction.
- Debonding: Triggered when the bonding field is contaminated, and mitigated by rubber dam isolation and proper material handling.
- Gum irritation: Caused by margins placed too deep subgingivally or by overhanging cement, and mitigated by proper margin design and cement clean-up.
- Shade or shape mismatch: Prevented by mandatory try-in under varied lighting before final cementation, and by retaining the DSD reference for the lab.
- Bite imbalance: Avoided by occlusal verification at try-in and at the first post-bonding follow-up.
These procedure-stage risks are separate from long-term wear; how long do veneers last depends on bond quality, material choice, and oral habits over the years that follow.
How Does the Veneers Procedure Differ for International Patients in Turkey?
For international patients, the veneers procedure in Turkey is compressed into a single 7 to 10 day trip by performing the digital workflow, lab fabrication, and bonding inside one coordinated clinical visit. This contrasts with the two to three week timeline common in countries where the lab is external to the clinic.
- Pre-arrival consultation: Photographs and X-rays are reviewed remotely so the planning phase begins before the patient travels.
- Day 1, in-clinic: Records, DSD review, and diagnostic mock-up.
- Day 2 or 3, in-clinic: Tooth preparation, 3D intraoral scanning, and temporary veneers.
- Days 3 to 7: Lab fabrication on site, with try-in scheduled when the veneers are ready.
- Day 8 to 10: Final adhesive bonding and follow-up bite check.
- Post-trip aftercare: Remote check-ins for early sensitivity, hygiene questions, or bite refinement.
International patient coordination covers airport transfers, accommodation arrangements, and remote aftercare scheduling.
Why Choose Vera Smile for the Veneers Procedure?
Vera Smile is an international dental clinic in Istanbul that delivers the full veneers procedure inside a single coordinated visit, using a digital workflow built around accuracy and minimal enamel removal. Treatment is planned around the patient’s bite, smile design, and travel constraints rather than being compressed for speed.
Patients choose dental treatment in Turkey because the clinic combines:
- Turkish Ministry of Health authorisation for full regulatory oversight.
- Slow Dentistry Global Network standards, which mandate proper isolation, time-controlled bonding, and disinfection protocols during the procedure.
- AACD-aligned cosmetic expertise for smile-design precision and shade reproduction.
- Digital Smile Design integrated into every full-arch case before any tooth is prepared.
- 3D intraoral scanning delivering marginal accuracy in the 20 to 50 micron range.
- CAD/CAM dentistry with in-house lab capability that shortens the international-patient timeline.
- Transparent treatment planning with written quotations, written material disclosures, and timeline commitments before travel.
- International patient coordination, including VIP airport transfers, accommodation arrangements, and remote aftercare scheduling.
The procedure is delivered in writing as a day-by-day plan before the patient travels, so every clinical milestone is known in advance.
FAQ
Yes. Direct composite veneers can be completed in a single appointment because they are built on the tooth chair-side. Porcelain and lithium disilicate veneers require at least two appointments because the restorations are fabricated outside the mouth and must be tried before bonding.
No. The procedure is performed under local anaesthesia. General anaesthesia or IV sedation is not required for routine veneer treatment. Patients with severe dental anxiety can discuss conscious sedation with the dental team in advance.
Yes, in many situations. Existing fillings can be reshaped or replaced during preparation. A tooth with a crown is not suitable for a veneer because there is no enamel to bond to; the existing crown would be replaced with a new restoration if cosmetic change is needed.
Permanent veneers are bonded with light-cure resin cement under controlled isolation. Snap-on veneers are a separate, non-clinical product made of acrylic that clips over the natural teeth and is removable. They are used for short-term cosmetic events only.
At try-in, the veneers are placed without cement, so any shape, length, or shade concern can be addressed before bonding. Adjustments range from minor glaze tuning at the clinic to a full lab remake when needed. Try-in is the dedicated checkpoint for patient sign-off.
Most international patients fly home within 24 hours of the final bonding appointment. The cement is fully cured before the patient leaves the chair. Sensitivity after the procedure does not interfere with travel. Remote follow-up is scheduled in advance.